

Add your first product
Give Sellify the product details it needs for research, buying angles and ads.
A product keeps your description, source pages, images and research together. Start with one product you know well. Accurate details here give Sellify better context for the angles and ads you create later.
Watch the walkthrough
Read the walkthrough steps
- Open Products and select Add product.
- Enter a product URL or add your own details.
- Review the saved description, source URL and product photos.
- Add genuine offers and supporting research.
Before you start
Open the workspace you want to use. You will need a product name and a short, accurate description. If you have a public product page, keep its URL handy.
Your plan must allow another product. Product slots and credits are separate: a positive credit balance does not mean you can add more products. See Understand credits.
One product per thing you advertise
A parent product in Sellify is the thing you run ads for, not a line in your catalog. A shop with 1,000 SKUs usually has only a handful of products here; twelve sizes of one sauna is one product. Angles and ads are generated per product, so splitting one item into variants means maintaining a separate set of angles for each, and it uses your allowance faster. Starter allows 1 product, Pro allows 5 and Ultra has no limit. See What counts as one product?.
Service workspaces see Service and Services wherever this section says Product and Products. The behavior is the same.
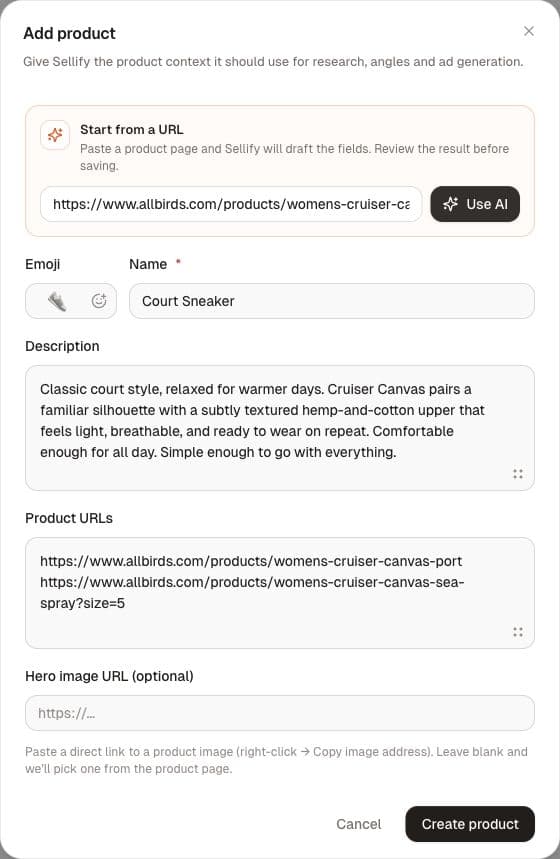
Add a product manually
- Under Brain in the sidebar, open Products.
- Select Add product.
- Enter the Name. Use a name you will recognize when selecting the product later.
- Add a Description. Explain what the product is, who it is for and the features you can substantiate. Include useful buying details, such as materials or dimensions. Avoid claims you cannot support.
- If available, add your product pages under Product URLs, one URL per line. The Hero image URL field is optional; it accepts a direct image link rather than a link to the page containing the image.
- Select Create product.
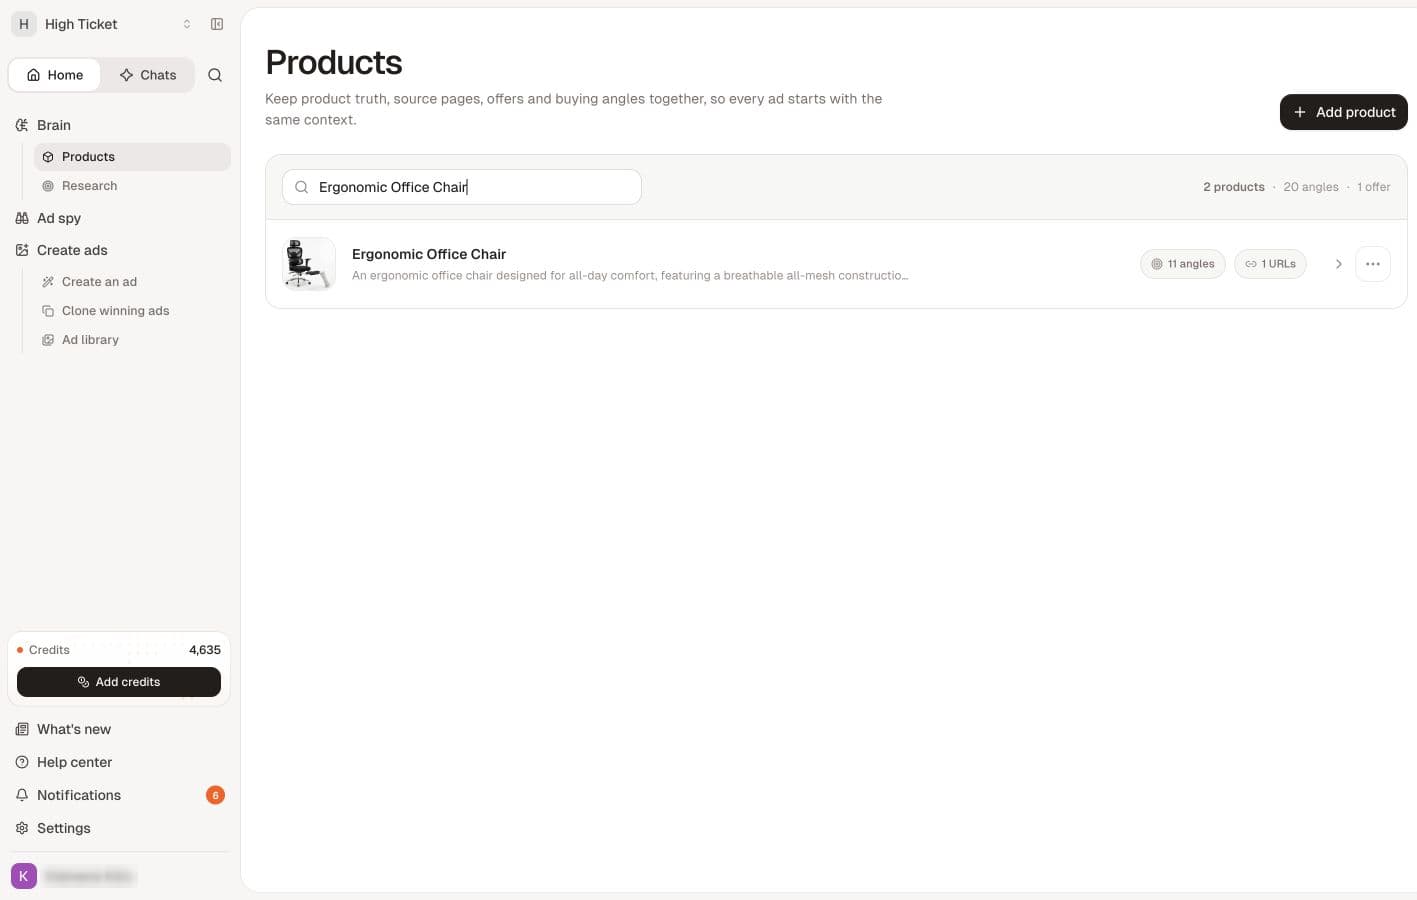
After a successful save, Sellify opens the product detail page. Check the product name and description, then return to Products and confirm the product appears in the library.
A useful description: “A 750 ml stainless steel bottle with a carry loop and screw-top lid, designed for commuting and day hikes.” This is a fictional example. Replace it with your product's verified details.
Start from a product page instead
In Add product, paste a public product-page URL into Start from a URL, then select Use AI. Wait for the fields to populate, review the name, description and URLs, and correct anything inaccurate before selecting Create product.
Use AI uses credits separately, about 4 credits per draft request (your provider configuration can change that). Generating a draft does not save the product, and running it again is another request. Check your product allowance before using credits on a draft.
When you save a product with URLs, Sellify also starts background enrichment, including description work and buying-angle generation. If no hero image is present, it attempts to find one. These steps can involve additional credit-using actions. Saving a product without URLs does not start that automatic enrichment.
Your first product
When the workspace has no products yet, Products opens a guided page instead of the Add product panel. Step 1, Your store, shows the workspace name. Step 2, Product context, holds the same Start from a URL box with Use AI, plus the Emoji, Name, Description, Product URLs and Hero image URL (optional) fields.
Select Create product & generate angles to save the product and start enrichment straight away. This flow asks for ten buying angles rather than the six the product page's Generate angles button requests. Select Skip for now to get the normal Products page and add the product later.
Optional research and images
You do not need to upload research to begin. If you already have useful material, the form accepts PDF, DOCX, TXT and MD research files, with up to 10 files at 10 MB each. Use material relevant to this product.
You can also review the Hero images, Offers, Research and Buying angles sections on the saved product page. Check imported or generated details before using them in an ad.
If something gets in the way
- Name is required: enter a product name before creating it.
- Product limit reached: the current plan does not allow another product. The dialog states what your plan includes and how many products the workspace has, then offers View plans or Not now. The same notice appears at the top of the Products page once you are at the limit. Buying credits alone does not increase the product allowance.
- Sellify cannot read the URL: check that the link opens the actual product page without a login. You can enter the details manually instead.
- The product saves but enrichment does not finish: open the saved product before trying to create it again. Review any error shown and check your credits.
Next step
Use the product's details to find and choose a buying angle.
Related
Prepare your product information · Review and update a saved product · What counts as one product? · Understand credits